Automating Openstack Deployment with Kolla Ansible

Introduction
Kolla Ansible is a “simple” and manageable way to automate the deployment of Openstack services. It solves a lot of the initial complexity arguments with setup as it can generate all the needed configuration files that might take a bare metal install hours or days to configure properly.
Kolla breaks up the Ansible playbooks into 5 distinct categories:
- Control - This handles all of the control backplane including and not limited to:
- The message queue service (RabbitMQ)
- Database and database backups (MariaDB/PostGRES)
- Key management (Barbican)
- Identity Engine (Keystone)
- Public API Access
- GUI Dashboards (Horizon/Skyline)
- Networking - Handles the Network backplane.
- Compute - Handles compute and associated dependencies for:
- VMs (Nova)
- Containers (Zun, Kuryr, Magnum)
- Storage - Handles storage or connections for:
- Object Storage (Swift/Ceph-RGW)
- Block Storage (Cinder + Cinder Backup)
- File Storage (Manila)
- Monitoring - Handles the cluster monitoring, alerting, and telemetry including:
- Billing (Cloudkitty)
- Alerting (Ceilometer, Aodh, Gnocchi)
- Log analysis (Opensearch)
Prerequisites
There is some assumed basic knowledge about Ansible works, mainly around the concepts of playbooks and inventory files. For Kolla deployment, only knowledge on how to configure inventory files is necessary.
Pre-Kolla Checklist
Before you can install Openstack, you need to prep the environment for Kolla to function. This includes:
- Installing FirewallD for distros not based on RHEL.
- Creating a kolla deployment machine (VM preferrable) that isn’t on network.
- Creating a kolla user with passwordless sudo access on each server.
- Installing the kolla user’s ssh key on the kolla user of every server.
- Bootstrapping the servers with Kolla dependencies.
It is a good idea to create a new Ceph cluster with Cephadm after bootstrapping the Kolla dependencies. This is because the Docker engine might get updated and will stop all containers. This can cause the cephadm module to fail.
FirewallD Configuration
Once FirewallD is installed, it is time to add some rules to make sure you don’t have a headache for network troubleshooting.
By default Kolla uses the FirewallD “public” zone for externally facing traffic and “internal” for any backplane communication.
Most of the ports for Kolla Services should be opened automatically, but some of the 3rd party dependencies do not automatically have their ports opened. Some of these dependencies include MariaDB, Open Virtual Networking (OVN), noVNC, etc.
The first step will be to add your external interface (vlan or flat) to the “public” FirewallD zone. It is important that this interface does not have an IP.
1
sudo firewall-cmd --permanent --zone=public --add-interface=<interface>
If you have any additional external networks you can run the same command again to add them to the zone.
Also ensure that you add an interface to the internal zone:
1
sudo firewall-cmd --permanent --zone=internal  --add-interface=<interface>
Afterwards it is crucial to add ports for internal services so everything works right on the first attempt. I’ve broken up the firewall rules by Hosts and Services.
All Hosts
These are ports required by Ceph Daemons and OSDs.
1
2
3
sudo firewall-cmd --zone=internal --add-port=3300/tcp --permanent
sudo firewall-cmd --zone=internal --add-port=6800-7300/tcp --permanent
sudo firewall-cmd --zone=internal --add-port=9100/tcp --permanent
Optional
This opens up the Loki export port. This is only required if you install Promtail/Loki with Ceph:
1
sudo firewall-cmd --zone=internal --add-port=9100/tcp --permanent
Recommended
Allows for internal hosts to be pingable:
1
2
3
firewall-cmd --zone=internal --add-icmp-block-inversion --permanent
firewall-cmd --zone=internal --add-icmp-block=echo-reply --permanent
firewall-cmd --zone=internal --add-icmp-block=echo-request --permanent
Ceph Managers
These ports open connectivity for the Ceph Dashboard, Grafana, and Prometheus.
1
2
3
4
sudo firewall-cmd --zone=internal --add-port=8443/tcp --permanent
sudo firewall-cmd --zone=internal --add-port=3000/tcp --permanent
sudo firewall-cmd --zone=internal --add-port=9095/tcp --permanent
sudo firewall-cmd --zone=internal --add-port=9283/tcp --permanent
Optional
This is the Loki ingest port. This is active on managers by default.
1
sudo firewall-cmd --zone=internal --add-port=3100/tcp --permanent
Ceph Monitors
This opens up the Ceph monitor node port. This is only required on nodes with the monitor role.
1
sudo firewall-cmd --zone=internal --add-port=6789/tcp --permanent
Openstack Manager Nodes
Most of the Openstack services that are created do not require a manual port opening. Some of the issues that I’ve had with Kolla on initial deployment was with MariaDB (3306), RabbitMQ (5672), and Cloud-Init (8775). These can be considered critical services as Openstack will not run properly without them, so please open ports for them if they have not been already. This will save you hours in troubleshooting time.
1
2
3
sudo firewall-cmd --zone=internal --add-port=3306/tcp --permanent
sudo firewall-cmd --zone=internal --add-port=5672/tcp --permanent
sudo firewall-cmd --zone=internal --add-port=8775/tcp --permanent
If you are running a clustered MariaDB environment, additional ports should be opened to facilitate cluster replication. If these ports are not opened, it may cause issues with replication.
1
2
sudo firewall-cmd --zone=internal --add-port=4567/tcp --permanent
sudo firewall-cmd --zone=internal --add-port=4568/tcp --permanent
Openstack Networking
Networking for Openstack nodes require certain ports to be opened for OVN to properly function. They need to be installed on all nodes managing networking and compute.
1
sudo firewall-cmd --zone=internal --add-port=6081/udp --permanent
On nodes running on the networking management side (not compute!), ports for the OVN Northbound and Southbound interfaces need to be opened.
1
sudo firewall-cmd --zone=internal --add-port=6641-6642/tcp --permanent
Openstack Compute Nodes
For the compute service, the only additional ports that need to be opened are the noVNC range. This should still be opened if SPICE is being used as the console.
1
sudo firewall-cmd --zone=internal --add-port=5900-5999/tcp --permanent
Setting up the deployment server
It is extremely important to use the same linux distro on the deployment server that the Openstack cloud will be running. If you are using Ubuntu, use Ubuntu for deployment. Rocky and Rocky, etc.
Go through the initial setup for the deployment server. If this is a new deployment server, I suggest that the kolla user be created at the initial install step.
Follow this guide on the Kolla Ansible docs page up to the “Prepare initial configuration” Section, as we will be deviating later in this article.
If you are creating a new Openstack cluster, run the kolla-genpwd command. This generates randomized secrets for all Openstack services.
Remember to enter the virtual environment before running any kolla commands!
1
kolla-genpwd
Creating the Kolla User
The Kolla user needs to be added to every host, including the ansible deployment host.
First, the kolla user and home directory need to be created.
1
sudo useradd -m kolla
After the user has been created, a password must be assigned.
1
sudo passwd kolla
Kolla Ansible requires passwordless sudo access for the kolla user. To do so, enter the sudoers file:
1
sudo visudo
Add the kolla user permission under the “User privilege” section of the sudoers file like so:
1
kolla ALL=(ALL) ALL
Once you’ve closed and saved the file, you are one step closer to an Openstack cluster!
Adding the Kolla ssh key to all hosts
After the creation of the Kolla user, generate or use an existing keypair for use on all machines and add it to the kolla user’s .ssh directory at /home/kolla/.ssh/authorized_keys. Add the ssh public key to every server that will be added to the Openstack cluster.
If you are in a large scale deployment using Ansible for bare metal deployment, you can change the user that Kolla uses to the Ansible deployment user. During the kolla bootstrap servers phase, the kolla user will be configured if it hasn’t been created already.
Bootstrapping Kolla dependencies
To bootstrap the Kolla dependencies, first you need to configure the Ansible inventory file. This will be depend entirely on your setup, but the kolla developers provide a sample globals.yml and inventory files. The sample globals file is in the /etc/kolla/ and the sample inventories are in ansible/inventory/.
In the inventory file, there are 5 initial ansible groups that need to be configured:
- control
- network
- compute
- monitoring
- storage
In our network configuration, we used linux bonds with LACP as our backbone. VLANs that run on top are used to segregate the different forms of traffic and increase performance. All of our deployment of Kolla was done on what is referred in the globals.yml file as the “network_interface”.
To add a host/node to the group, add the name of the host below the group role you want to assign. You can assign multiple roles to one host.
By default, Kolla Ansible will try and resolve the hostnames of all the IPs of each host in the inventory file. If you want this behavior to continue, edit the /etc/hosts file in your deployment node and add all the respective hostname and IP associations required. This won’t be required if there is an already established DNS server configured with the appropriate records.
If you do not want to use hostnames for ansible, you can force resolutions with IPs using ansible_host=<ip> next to the hostname.
Remember to specify the user Kolla Ansible uses to login to the nodes by specifying
ansible_user=kolla, replacing kolla with the ansible user you created earlier if necessary.
There are 2 additional arguments that are necessary for proper Kolla Ansible usage:
ansible_become=Trueargument must be added to each host set to allow Ansible to escalate sudo privileges.- Not required if using root login (not recommended, bad security practice)
ansible_private_key_file=/path/to/keyargument must be added if you are not using a default ssh key for the deployment host.
Here’s an example setup using all of the previous information for the control role:
1
2
3
4
5
[control]
controller1 ansible_host=10.75.10.5
controller2 ansible_host=10.75.10.6

controller[1:2] ansible_user=kolla ansible_private_key_file=/home/kolla/.ssh/kollakey
Once the inventory is done, you can run the bootstrap servers command in the Kolla virtual environment you made:
1
kolla-ansible -i multinode bootstrap-servers
The bootstrap servers command is potentially destructive! Ensure that there are no running docker containers as the Docker engine might be restarted and updated. This may prevent the restart of previous containers!
After the Kolla dependencies have been installed, it’s time to start working on the deployment of Openstack!
Configuring Openstack Services
This section will go over configuring the globals.yml file for Openstack deployment.
Mandatory Changes
kolla_base_distro - Change this to the distro that you are using for deployment
kolla_internal_vip_address - Required as a unused IP in the Kolla internal network for HAProxy.
- Typically run on the Kolla backplane but can be configured further if necessary.
network_interface - This is the internal kolla network interface
openstack_region_name - Give your region a descriptive name instead of the default “RegionOne”
enable_mariadb_backup - While this is technically an “optional” change, it is required for any production environment.
enable_neutron_provider_networks - This allows your Openstack instances to reach out to the Internet
Recommended Changes
openstack_release - Change this to set the version of openstack you want to deploy.
- I recommend against setting this to “Latest” and instead setting it to the latest stable kolla version.
kolla_external_vip_address - This splits the 1 VIP into 2, allowing for public access from another subnet
- Run this in a separate subnet from the internal VIP to create a separate HAProxy for public consumption
kolla_external_fqdn - Give the external VIP a hostname!
kolla_external_vip_interface - Interface where the external VIP lives
- I recommend that this is changed to another interface from the internal for security and traffic reasons.
neutron_external_interface - Used for provider (external) networks, different from the Kolla external network.
- If you have multiple provider networks, separate the interfaces by commas: “interface1,interface2,interfacen``
If using multiple interfaces, the
neutron_bridge_nameargument is required
neutron_bridge_name - Used to add multiple neutron bridges for external networks. Always starts with “br-ex”
- Separated by commas: “br-ex,br-ex1,br-exn”
enable_external_api_firewalld - Turning this to “true” allows for kolla to configure FirewallD automatically for Openstack APIs
OVN Neutron changes
neutron_plugin_agent - Defaulted to openvswitch, but can be changed to your needs
- I recommend using
ovn(Openvswitch Virtual Networking) as it brings several improvements on top of OVS
neutron_ovn_distributed_fip - This allows OVN to route traffic through each physical host
neutron_ovn_dhcp_agent - This is important for Cloud-init to function properly.
Using Ceph for Cinder/backup and Glance
If you are going to use Ceph for your Openstack storage backend, please walk through this configuration guide then return back here for the rest of the configuration process.
Using Ceph as a Storage backend requires the use of the Nova keyring/user/pool configuration, even if you aren’t using Nova ephemeral storage.
First, you need to enable the services for Cinder and Cinder backups if they aren’t already. Afterwards, you need to enable the Ceph backend for Glance and Cinder.
cinder_backend_ceph: "yes"
cinder_backup_driver: "ceph"
glance_backend_ceph: "yes"
Once the backends for Ceph have been enabled, you can start on the configuration in the “External Ceph” section of the globals file.
All of these Ceph options are based on what was previously configured from the Ceph cluster. For each pool and user created, uncomment the lines in the globals.yml file for the services you want enabled. Replace the values given with what you configured your Ceph cluster with. An example config has been attached below:
1
2
3
4
5
6
7
8
9
10
11
12
13
14
15
16
17
18
19
20
21
22
23
24
25
26
27
28
29
#######################
# External Ceph options
#######################
# External Ceph - cephx auth enabled (this is the standard nowadays, defaults to yes)
#external_ceph_cephx_enabled: "yes"

# Glance
ceph_glance_keyring: "ceph.{{ ceph_glance_user }}.keyring"
ceph_glance_user: "glance"
ceph_glance_pool_name: "glance-images"
# Cinder
ceph_cinder_keyring: "ceph.{{ ceph_cinder_user }}.keyring"
ceph_cinder_user: "cinder"
ceph_cinder_pool_name: "cinder"
# Cinder Backup
ceph_cinder_backup_keyring: "ceph.client.{{ ceph_cinder_backup_user }}.keyring"
ceph_cinder_backup_user: "cinder-backup"
ceph_cinder_backup_pool_name: "backups"
# Nova
ceph_nova_keyring: "{{ ceph_cinder_keyring }}"
ceph_nova_user: "cinder"
ceph_nova_pool_name: "adminpool"
# Gnocchi
#ceph_gnocchi_keyring: "ceph.client.{{ ceph_gnocchi_user }}.keyring"
#ceph_gnocchi_user: "gnocchi"
#ceph_gnocchi_pool_name: "gnocchi"
# Manila
#ceph_manila_keyring: "ceph.client.{{ ceph_manila_user }}.keyring"
#ceph_manila_user: "manila"
Depending on what components are being used for your configuration, this kolla config folder might be different. This folder structure assumes that Cinder, Cinder backup, and Glance components are using Ceph as their storage backend. For any additional services, they should follow a similar folder format like /glance/ or /nova/.
1
2
3
4
5
6
7
8
9
10
11
12
13
14
15
16
17
.
├── cinder
│   ├── ceph.conf
│   ├── cinder-backup
│   │   ├── ceph.client.cinder-backup.keyring
│   │   └── ceph.client.cinder.keyring
│   └── cinder-volume
│       └── ceph.client.cinder.keyring
├── cinder.conf
├── glance
│   ├── ceph.client.glance.keyring
│   └── ceph.conf
├── glance-api.conf
├── nova
│   ├── ceph.client.cinder.keyring
│   └── ceph.conf
└── nova.conf
Copy the keyring and ceph.conf files into the associated folder structure depending on your naming convention used while deploying Ceph.
Deploying Kolla Ansible
Once all the inventory and global files are finalized, it is time to prep the servers for initial deployment. This will be the shortest (and potentially the longest) part of this entire guide.
Consider a local Docker registry
Depending on your security policies, a local docker registry might have been deployed. With our deployment, we did not set up a local registry since our cluster was small enough where this would not cause massive issues with network congestion/saturation. For clusters greater than 10 servers, I would suggest a local registry.
You can set up a local registry for Kolla to use with the guide here.
Running container pulls and prechecks
Before any Kolla deployment or upgrade, I would suggest running container pulls and prechecks to ensure that there will be a smooth upgrade process.
The command below will by default pull the latest docker containers unless another tag is specified in the globals.yml file.
1
kolla-ansible -i <inventory> pull
Running the prechecks command uses playbooks to identify configuration issues.
1
kolla-ansible -i <inventory> prechecks
The prechecks command cannot detect issues in configurations if the status of the container is “Untested” in the Kolla Support Matrix
 A successful prechecks run
It is normal for your deployment host to fail the passwordless sudo check depending on host configuration.
Deploying Openstack
Deploying Openstack will probably take the most time depending on the overall size of the cluster. Initial deployment also takes significantly longer than any subsequent runs as this is the first time that services are being spun up.
To finalize Openstack deployment, run deploy on Kolla Ansible:
1
kolla-ansible -i <inventory> deploy
As long as there are no fails during deployment, the newly created Openstack cluster should be functional!
How to know when Ceph and Openstack connections are working
After Openstack has been deployed and if you are running Ceph, it is a good idea to double check and ensure that the connections are functioning properly.
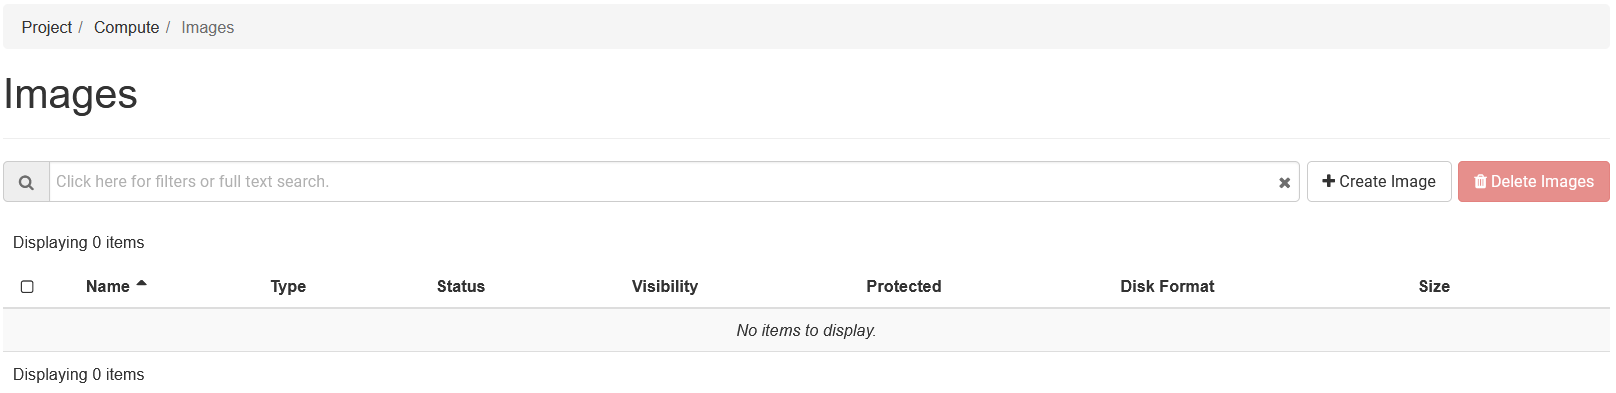
Glance

For Glance images, you will know that everything is functional when you do not see the error (left) and instead see no images (below).
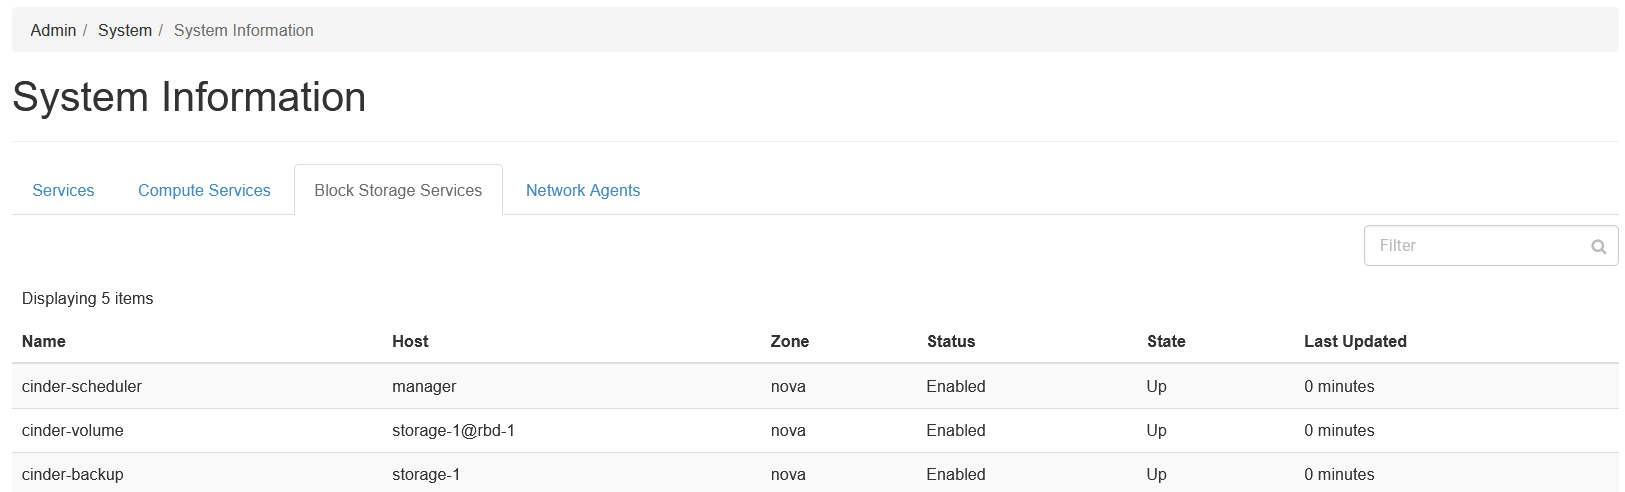
Cinder / Cinder Backup
Cinder and Cinder Backup service statuses can be found using an account with the “Admin” permissions set under System -> System Information -> Block Storage Devices.
Troubleshooting
While I won’t be able to give specific advice on all issues that might come up during deployment, there are a few issues that I’ve encountered during deployment.
Firewall misconfiguration
Firewalls and closed ports are probably one of the biggest problems you will run while deploying Openstack. Double check to make sure that all ports have been opened for deployed services. This may seem obvious, but especially with the untested components, closed ports used by a critical service is common.
Ceph services not communicating
This can be a few issues:
- Keyrings are not being parsed properly
- Ceph.conf files did not get moved to the proper
/etc/cephfolder - Nova RBD UUID secret needs to be refreshed
These are some of the issues that I experienced with Ceph and connecting them to Openstack.
Here are some helpful log file locations for debugging:
- /var/log/kolla/glance/glance-api.log
- /var/log/kolla/cinder/cinder-volume.log
- /var/log/kolla/cinder/cinder-backup.log
Wrong folder location for configs
If some configurations are not applying, ensure that the files are in the correct folders underlined by Openstack documentation. (you will probably have to search around for it)
Final Thoughts
Deploying Openstack can be a daunting task but tools like Kolla Ansible have made the deployment process a breeze. This has helped organizations that historically would not have been able to maintain (or deploy) an Openstack instance bring Openstack into reach. While difficult, the end product after deployment is worth the effort required.
Please reach out to me if there are any corrects that I need to address. I hope my insights here help you on your Openstack journey!
Resources
These are some of the resources that were used while deploying Kolla: